
One of the most important phases of penetration testing is maintaining access. Once an ethical hacker has gained access to the target, he or she must maintain access long enough to accomplish his or her objectives. What I learned last week was that when I have located the vulnerabilities and exploit the target, there is still another phase where I should access or enter the system. To enter the system there are many ways such as using backdoor or maybe escalate privileges to gain more access to the system. Recently, I found that Metasploit is really a great tool to use. Other tools that I found also useful on the internet are Webshells, Powersploit and Weevely.
Target Exploitation
Target exploitation is one of the most important phases of a penetration test. It focuses on establishing access to a system by bypassing the security restrictions. An exploit itself is a piece of software or a sequence of command that takes advantage of a particular vulnerability which is the weakness in the system. Although exploits can occur in a variety of ways, one of the most common methods for exploits is launched from malicious websites. The victim could visit that malicious website by accident or they might be tricked by clicking that particular malicious website in a phishing email or a malicious advertisement. Target exploitation could be done by using Metasploit and below are the steps.
1. Make new IP address interface
– ifconfig (interface) (IPAddress) (subnetMask)
– sudo (interface) (ipAddress) (subnetMask) | To check only
2. Connect with the target by pinging them
– ping (IPAddress(target))
3. Start the Metasploit
– msfconsole
4. In this case, we try using Windows 8
– use windows/smb/ms08_067_netapi | Determine which target exploits
5. Check whether LHOST and RHOST are set or not
– show options
6. set LHOST (our IPAddress)
7. set RHOST (target’s IPAddress)
8. set PAYLOAD
10. exploit
Lastly, by using meterpreter, I could use a lot of commands such as shutdown, reboot, screenshot and other stuff that I could do remotely from my place.
Social Engineering
Social engineering is a technique that manipulates someone’s psychology to get one or more certain information by deceives them without they knowing our main goal which is to get personal/crucial information from them.
Nowadays, one of the most often technique used by people in social engineering is phishing. Phishing is a cyber crime which the attacker sent an email to the target, telephone, or text message that sometimes posing as a legitimate institution to lure the target to click the link that given by the attacker. In other words, the target will provide their sensitive data such as email, password, banking and credit card details. The information that the attacker got is then used to access the target’s account and of course, they have 100% control to your account.
Tools:
- Social Engineering Toolkit(SET)
- Gophish
- SocialFish
Recently, my sister got a suspicious mail from Apple company through yahoo email. She realized that the email was suspicious when she saw the From section of the email. See the picture below.
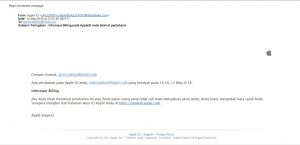
In the picture above the sender email address just too random and so suspicious, like how can a company like Apple has an email address with 888bestdeals.com. So she thought it is not from the official Apple company. But to make sure it is really fake so she forwarded me that email to me to ask me whether it is a real email or it is a phishing email. Thanks to my teacher I could know whether it is real or fake email by dragging my mouse cursor to the link. Although the sender used the phishing link as same as the real link of apple company, but sometimes it is just a fake by using href with blue color and underlined for the link. So to make it is real I try to drag my mouse cursor to the link.
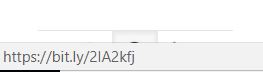
Surprisingly, the attacker use another fake link by using URL shortener such as bit.ly. When I checked using virustotal, of course the result will be like in the picture below:
Because the url based on bit.ly, so the virustotal.com will check that the url is clean.
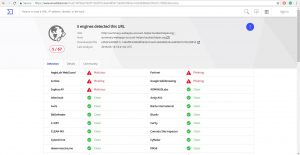
So there is no other way to check using virustotal.com except I visited the phishing link itself. I have no screenshot of the phishing link because the website already shut down. But since I have the url, I copy paste the url to virustotal.com. And I found out that it was a phishing link.
In conclusion, be careful to any email that we have received. Always check the sender’s email and the link that given in that email.
DVWA Installation
In this week, I learned mainly about how to install Damn Vulnerable Web Application or usually known as DVWA . Below are the steps that I did to install DVWA in Kali Linux.
Step 1
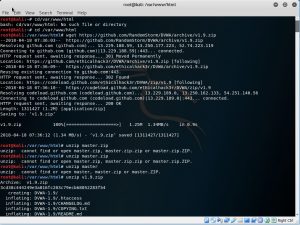
Firstly, change directory to /var/www/html using cd command. With the current directory, wget(web get) from a github link that my teacher has provided in the WhatsApp group for installing DVWA. So basically, it will copy/clone the files from that specific github url. From that site, I got v1.9.zip that saved in the current directory. Then unzip the zip file(v1.9.zip) to extract it to the directory.
Step 2
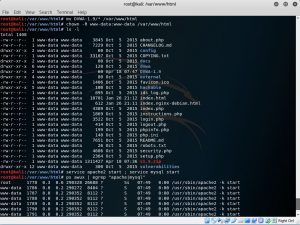
After the file has zipped, move the content from the directory DVWA-1.9 to the web root directory by typing mv DVWA-1.9/* /var/www/html. And then chown the directory to change owner. Check whether v1.9.zip is in the directory or not by using ls -l command. When the v1.9.zip is there, it means that the zip file is successfully loaded into the directory. To start the apache and mysql, use service apache2 start ; service mysql start. And lastly, type ps awux | egrep “apache|mysql”.
Step 3

In the picture above, it is mainly about setup the database such as name, password, and privileges. When the database setup is done, use nano to run the config.inc.php file.
Step 4
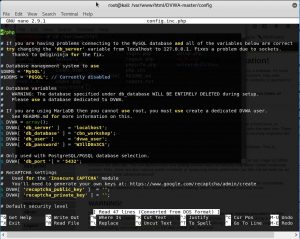
Above picture is the config.inc.php file. I configure it according to the database that I have set up before in step 3.
After that open the DVWA installation in the browser and create the database. Then type the username and password that I have set up before.
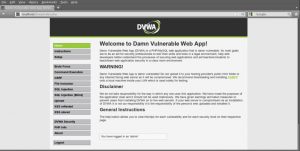
Finally, the site will show the frontpage of DVWA, means that I have successfully installed it. With DVWA, I could learn so many methods like Brute Force, Command Injection, SQL Injection and many other methods with various difficulty levels, with a simple straightforward interface.
Ping sweep with Nmap and Fping
From what I learn last week, ping sweep is basically a technique to find out which hosts are up in a network according to the range of IP addresses that I have set by pinging an entire range of network IP addresses . In this case, I am looking for the active hosts in the range of 125.161.187.1-35.
First I am using Nmap scanning tool to determine which host is up from the range that I have chosen.
nmap -sP 125.161.187.1-35

In the picture above, it shows 35 active hosts from the range 125.161.187.1-35. After that, I am trying to use fping to test whether the results are the same or not.
fping -g 125.161.187.1 125.161.187.35
The results from both tools are same, which is means that we can use any of those tools to determine which host in up in the given range.
Port scanning using Nmap
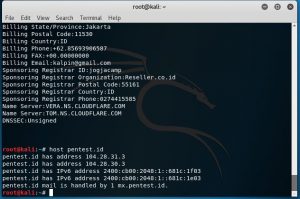
Nmap or Network Mapper is a tool in kali linux that specially for port scanning. With this tool, we can see the active host, the open port, the operating system that used by the host and others scanning features. In this case, I am trying to scan pentest.id as a target.
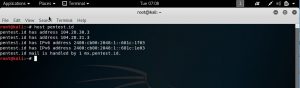
First I am trying to get the IP address of the target shown in the picture below.
host pentest.id
And then I am using nmap -O to detect the OS version that is used and also the open ports as well as the service. In the picture below, some ports that are opened are port 53, port 80, port 443, port 8080 and port 8443.
nmap -O pentest.id or nmap -O 104.28.30.3
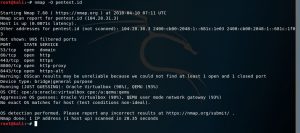
When we include -sV in nmap scanning, it will show the versions of the open ports as well.
nmap -sV 104.28.30.3 -A

Enumerating WP Target by using wpscan, joomscan and theHarvester
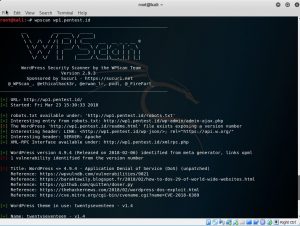
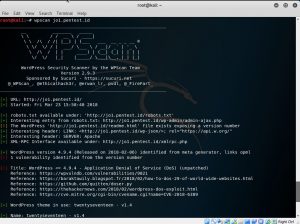
So last week we had an exercise to try enumerate wp1.pentest.id and jo1.pentest.id. From what I learned, WPScan is used to find vulnerabilities for CMS WordPress. Moreover, it could also find a list of plugins and themes that were used by the target. As well as Joomscan, it is used to find vulnerabilities, but it is especially for a website that used CMS Joomla.
WPscan wp1.pentest.id
WPscan jo1.pentest.id
From using wpscan command, I could scan vulnerabilities from pentest.id or other any website that based on CMS WordPress.
theharvester pentest.id
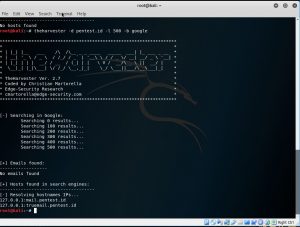
Another command that I used is theharvester. With it, we could gather the emails, the hosts, the open ports and banners from a specific website through different public sources like search engines.
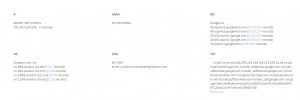
Using dnstrails.com
Last week, I learned to use online tools to discover old DNS and the real IP address behind the firewall. One of the online tools that I tried was dnstrails.com. In dnstrails.com, I could get so many information for a specific website such as the registrant, the registrar, the admin contact, the real IP, the other hosts that in the same server, the subdomains and many else. Moreover, I could also determine whether the emails that they sent in spf are as spam or not, it will be spam if the IP they’re using is different.
The records:
We could get address mapping record, IPv6 address records, mail exchanger records, name server records, start of authority records and text records.
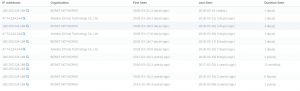
History data:
We could get the old script, which may contain vulnerable code and the old admin page, which we could brute force it and other sensitive informations
Information Gathering & Utilizing Search Engine using Kali Linux
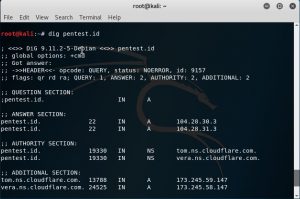
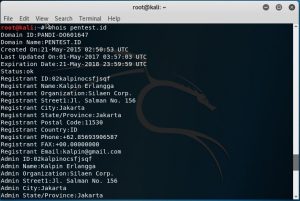
Last week, I learned information gathering towards a website to get the information such as the registrant information, their server, their email server and many other stuff using Dig, Whois, Host in Kali Linux.
Dig pentest.id
Host pentest.id
Whois pentest.id
I also learned about DNS and Zone transfer tools like I mentioned before. With zone transfers tool like dig, I am able to check many pieces of information regarding domain name server.
Using Paros Proxy
Last week, I learned that website is an easy source of information. We could get a lot of informations from a website. One of the tools that we learned is paros proxy. It is a Java-based web proxy for accessing web application vulnerability. It includes a web traffic recorder, web spider, hash calculator, and a scanner for testing common web application attacks such as SQL injection and cross-site scripting.
Below are the experiment I do using paros proxy.
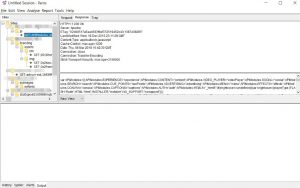
With paros proxy, I was able to see the structure of this company’s website
As we can see from the picture, I could see the details like the subfolder and the domains.
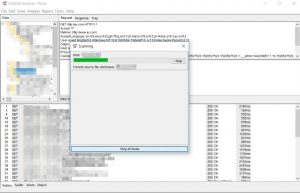
In the paros proxy, we can scan a specific folder to see the their vulnerabilities. In this case, I scanned the main page of the company’s website.
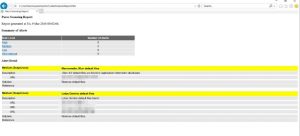
And then there will be a generated scanning report in the LatestScanningReport.htm which is the result from the scanning. I could see the risk level whether is high, low or medium and also the website server, etc.