Introduction to Ethical Hacking and Penetration Testing

On the first day of my Ethical Hacking and Penetration Testing class, I learned many things about the introduction regarding ethical hacking and penetration test. There are many terms that I learned such as:

  • Ethical Hackers: Someone who employed by companies to do penetration testing(with permission)
  • Penetration Test: An attempt to break into company’s system or network to find the vulnerabilities inside it and always ends with report findings.
  • Hackers: Someone who access the computer system or network without any permission/authorization
  • Crackers: Someone who access the computer system to destroy or steal data
  • Script Kiddies/Packet Monkey: A young inexperienced hackers who copy techniques from an experienced hacker
  • Tiger Box: A collection of hacking tools for penetration testers
  • White box model: A model where penetration tester is told everything about the network topologies
  • Black box model: A model where penetration tester is not given details about the network
  • Gray box model: A model where the company gives partial information about the network topologies to the penetration tester
  • Red team: A team that performing penetration testing to a specific target
  • Blue team: A team that defend the system from the attackers

In conclusion, those terms are very important for me before I learn further about the penetration test and ethical hacker.

Final Project Report

Seafood Frenzy

For the final project, we decided to make a slicing game called Seafood Frenzy. Its priority is to entertain and educate children under 10 years old. The main application that we used for this game is Construct 2. Meanwhile, the vectors and the motion graphics are made by Adobe Illustrator and Adobe After Effects. This game is divided into 3 main layouts(Home layout, Game layout and Game Over layout).

Home Layout

The Home layout represents buttons for the children to pick. There are three main buttons for this game which is :

Play Button: It will first show the Game layout. The Game layout is the most important layout since basically its the game itself.  In this layout,  the seafood will be spawned from the bottom and the player should slice each of it to get the score.  The game will be over when the player is not able to hit the seafood for three times and also slicing the poisonous fish will instantly game over. There is also power-up(the bar at the top) that will be explained briefly in the tutorial layouts.

Game Layout

After the player does not manage to slice the seafood for three times or accidentally hit the poisonous fish,  the Game Over layout will show up as the picture shown below.

Game Over Layout

As we can see, there are different types of medals.

  • Bronze medal: The score is under 30.
  • Silver medal: The score is between 30 and 70.
  • Gold medal: The score is higher than 70.

It also shows two buttons, Try Again button and Main Menu button. If the player presses the try again button, the Game layout will reappear. Meanwhile, the Main Menu Button will show the Home layout.

Tutorial Button: It will show the game tutorials which is mandatory for a new player to gain information about how this game works.

Note: There is a text-to-voice button(the music icon) next to each tutorial that will help the tutorials more understandable for the player especially children.

The first layout of the tutorial shows how to slice the seafood and how the power bar works.

The second layout shows types of seafood that are safe to be sliced later in the game.

The third layout informs the player about power-up and poisonous fish. The power-up is related to the power bar. Each time the player slice a golden fish, the power bar will gain a bit. And continuously after the bar is full, the player can use the power-up by pressing the space bar on the keyboard. The time they used the power-up, more and more seafood will be spawned for ten seconds. Within ten seconds, the player is invulnerable to the poisonous fish and although some seafood may not be sliced, it will not count as a fail.

Credits Button: It will show some sources such as background music, background image, and vectors.

Last but not least, the credits. Some of the vectors are not made by ours, so it is safe to cite their work to avoid copyright infringement.

Proposal Final Project

Our game is called Seafood Frenzy. This game is an educational slicing game which helps children to differentiate types of seafood. Our priorities are to entertain and educate children under 10 years old. We show motion graphics animation using vector in a way that will make children feel excited to play this game. This game was made by an application called Construct 2.

Before we start our project, we gather several ideas to make an user-friendly game that prioritizing children. After the ideas come up, we started to begin the project. I am working on the vectors, the animations for Home, Game, and Game Over layout and several actions as well as the events in the main layout.

FASTCABS Database Application

FastCabs Application

1. Application overview

This application is made for the FASTCABS company. This application allows the the users to add orders made by clients, show list of orders that have been made, the status of those orders whether it has been completed or not, update the order that have been made by the clients.

An order via call made by clients will be handled by administrative staff who operates the software in an office. There are two types of clients, Private and Clients. For Private type, the price will be vary subject to mileage while Business’ order type is more formal and requires contract agreement between FASTCABS company and the business clients, the price will be fixed subject to agreement of the contract.
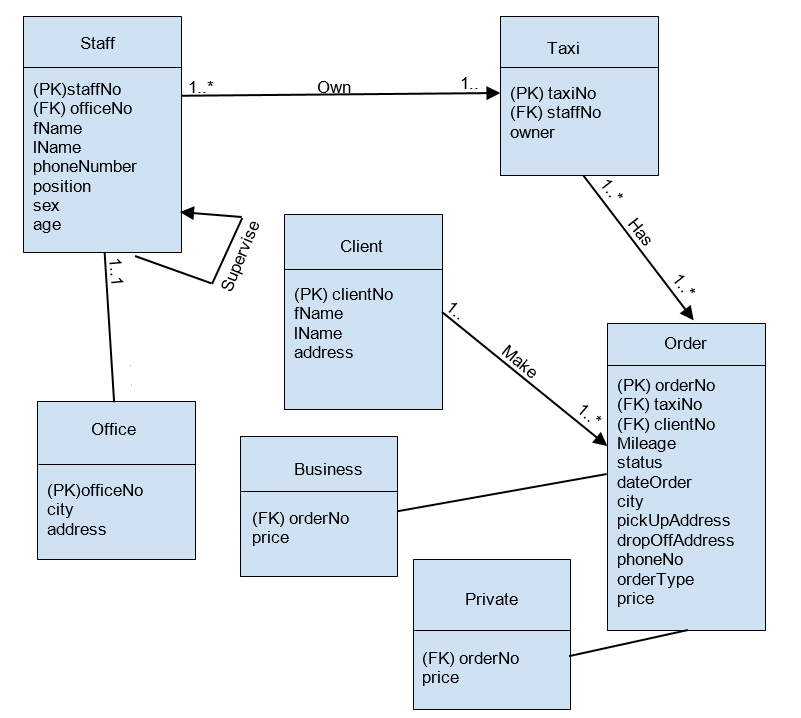
FASTCABS ER Model

2. Application

Main Menu

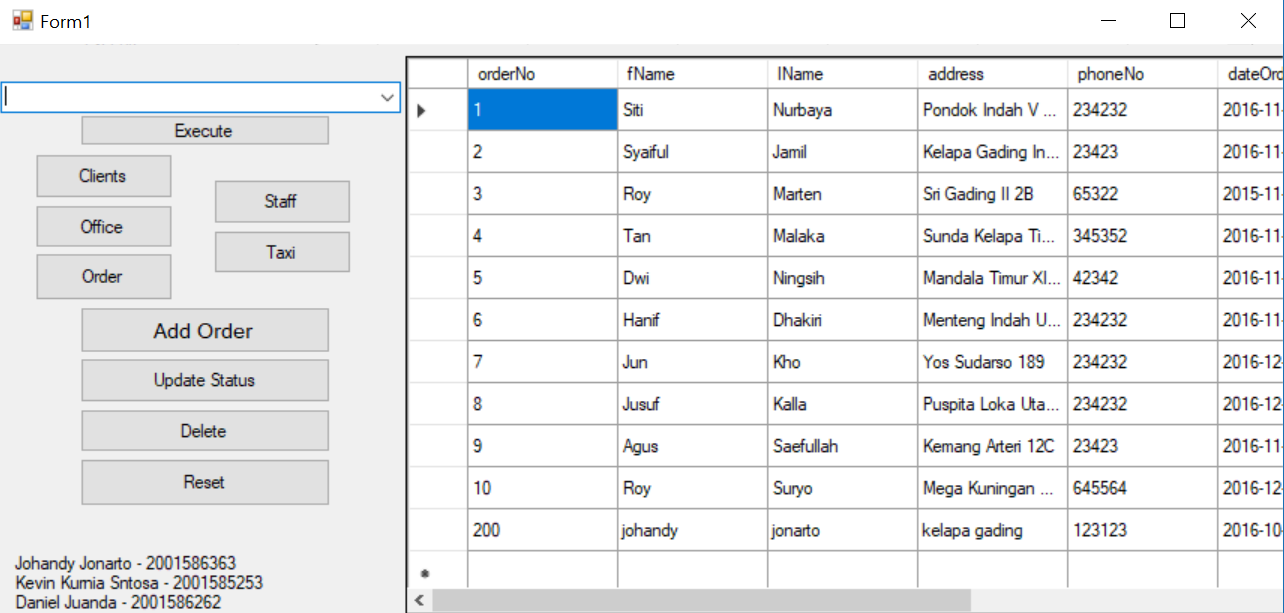
At this main menu, users have several buttons and a table. The table is automatically loaded lists the details of all recent orders made by both Private and Business clients, the table shows information of clients such as name of client, address, phone, order date, mileage, order status and driver’s name.

2.1 Combo Box

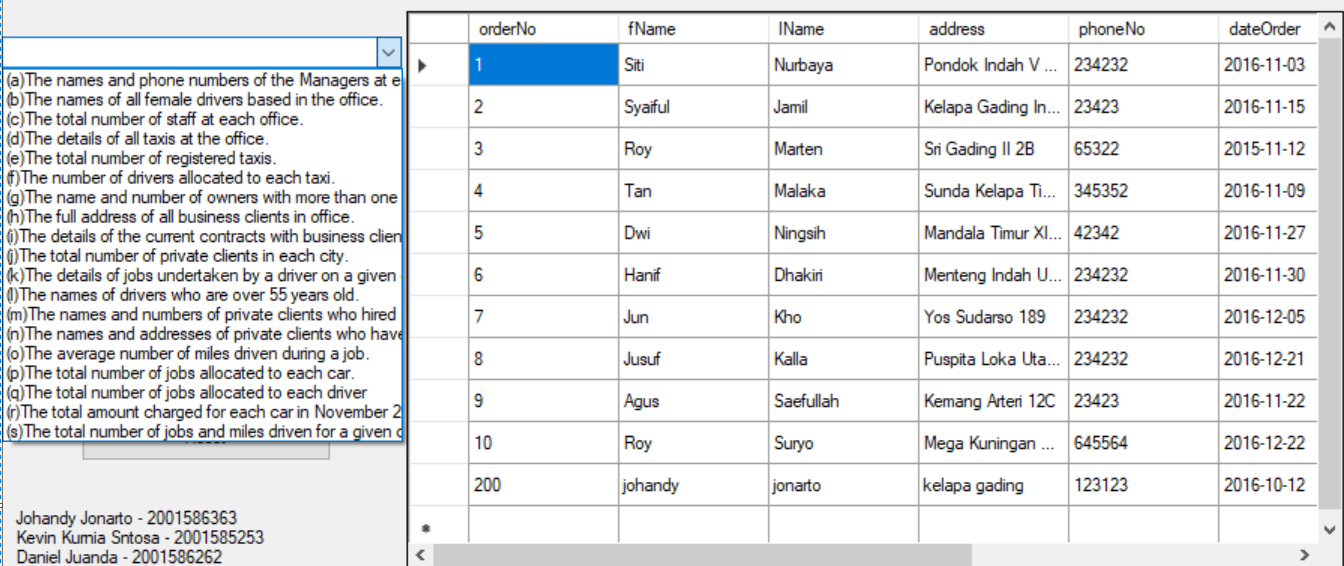
Opening the combo box will display several list of queries to acquire information from database . After the user choose an option from the combo box and click the execute button, the program will display the table according to the option he/she choose. For example, when the user choose option (a) which is the names and phone numbers of the manager in each office, the application will execute the query for option (a) and show it in the table view according to the database.

2.2 Clients

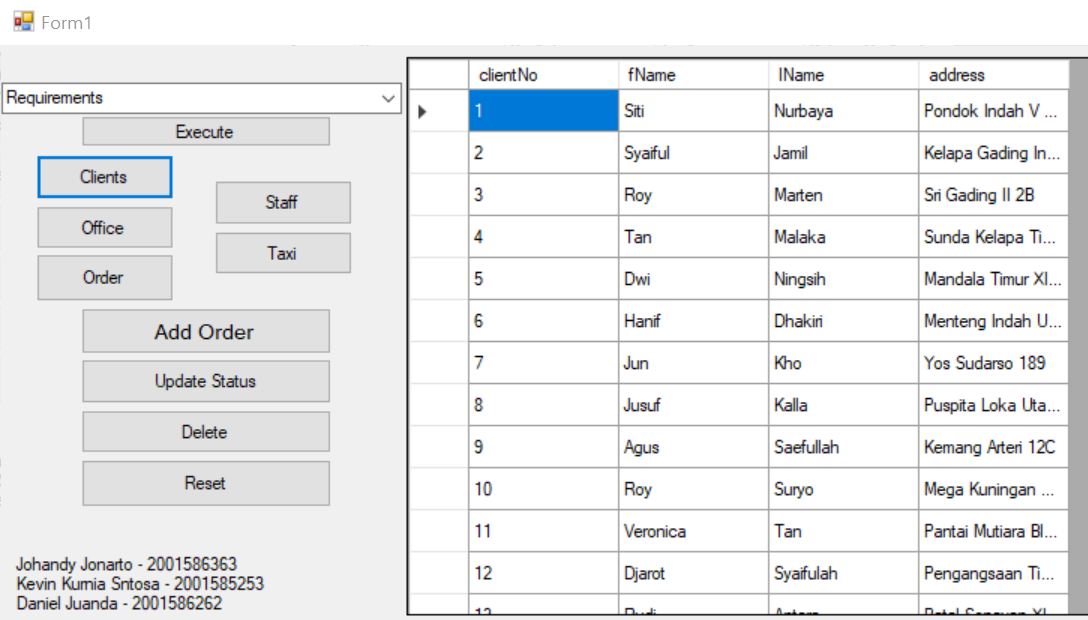
The Clients button display a table containing clientNo, fName(first name), lName(last name), and address of the clients.

2.3 Office

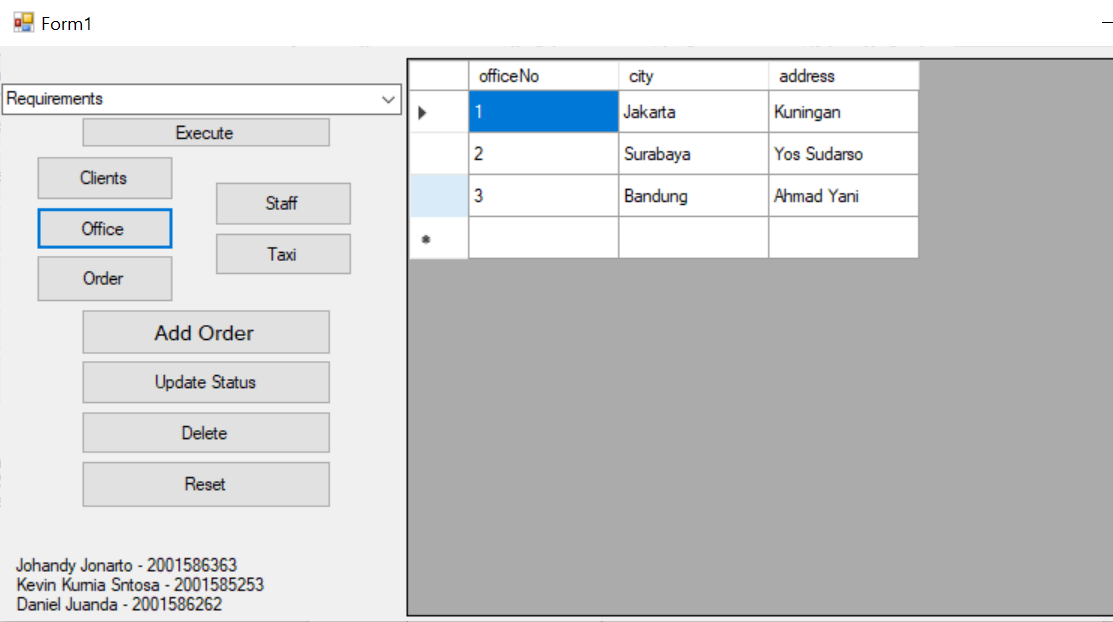
The Office button performs an action which will display a table that lists the details of all FASTCABS’ office including city and address of each office.

2.2 Order

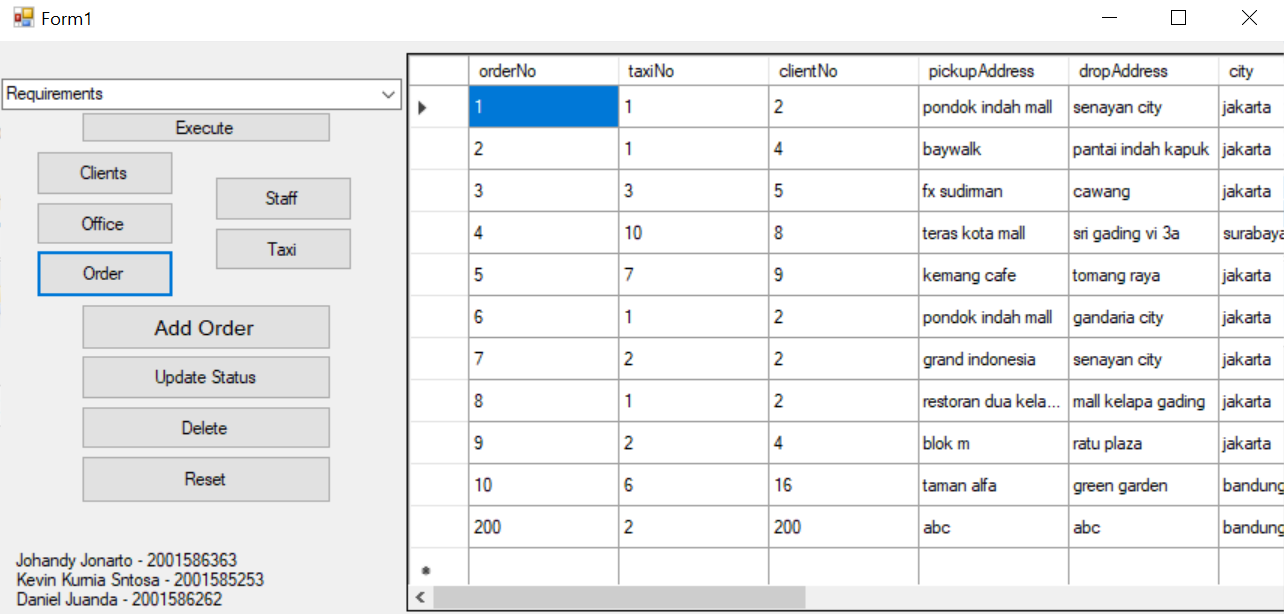
The ‘order’ button will display the clients order number, taxiNo shows which taxi are used, clientNo, pickupAddress tells the location where the clients get picked up, dropAddress show the destination of the client, city display which city did the clients order from, phoneNo tells the clients phone number in case of emergency, orderType told the user to pick whether they ordered taxi for private or business purpose, dateOrder shows the date they made that order, mileage tells the distance from pickup to destination, statusOrder determine whether the order have been completed or not, and price shows the price list.

2.3 Staff

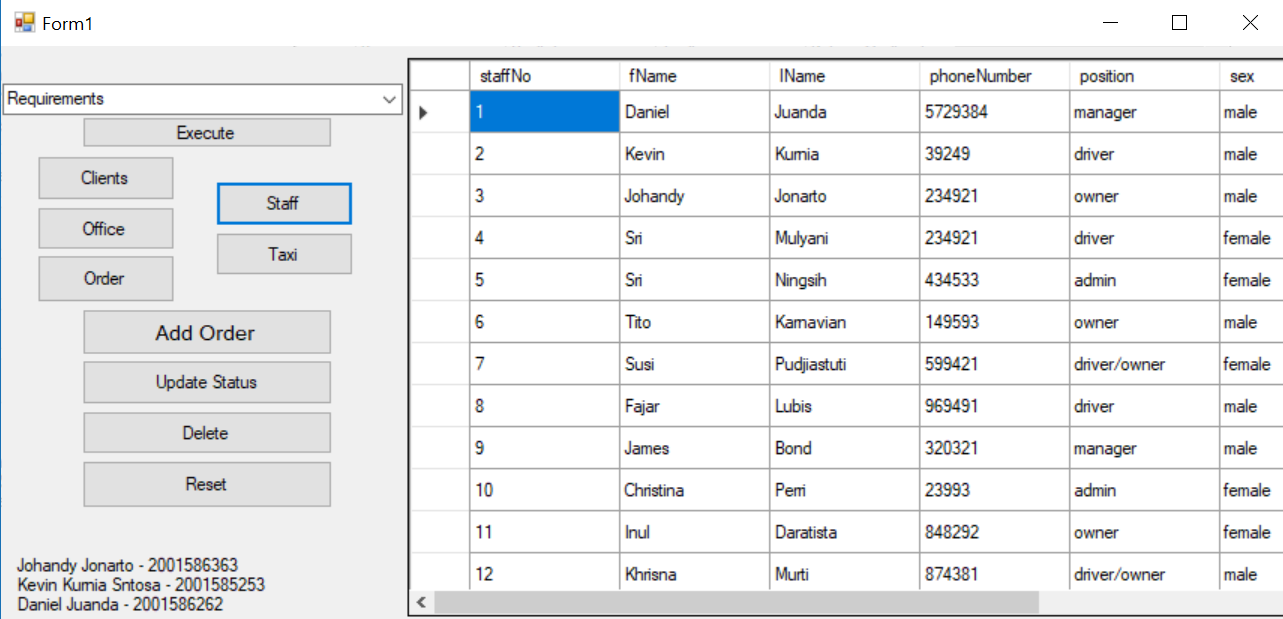
The staff button will query and get details from database to show a table containing staffNo, fName(first name), lName(last name), phoneNumber, position, sex, officeNo, and dob(date of birth).

2.2 Taxi

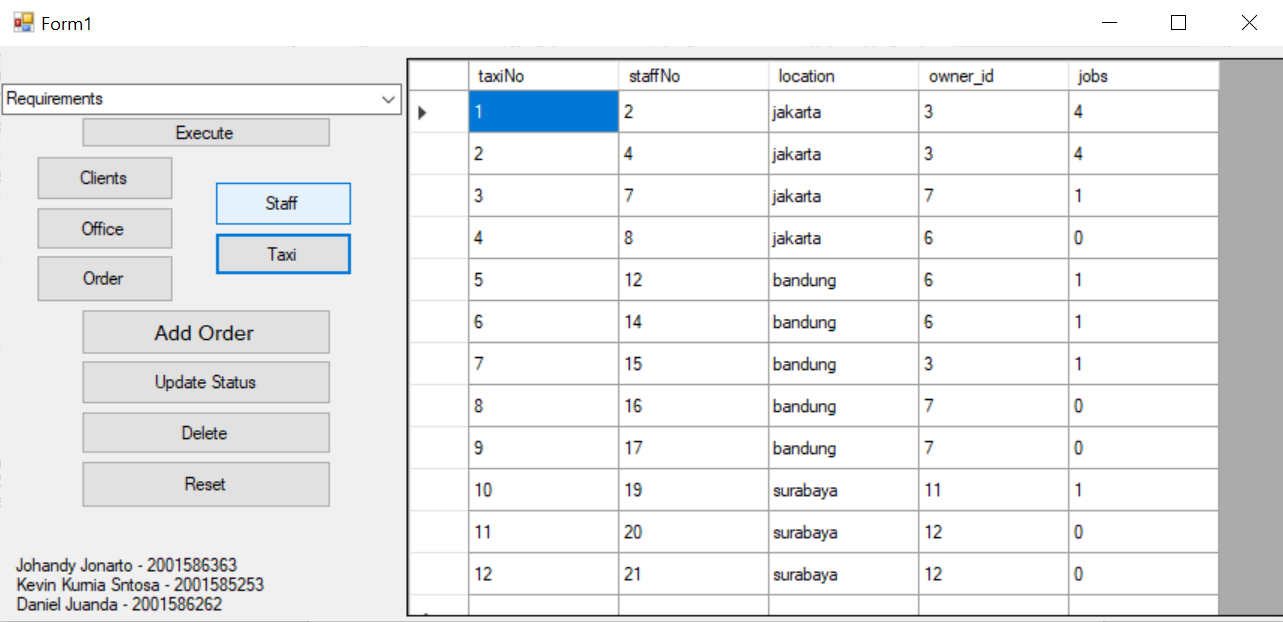
The taxi button display a table regarding taxi which contans TaxiNo which shows which taxi are being reffered, staffNo show which staff are using that taxi, location shows the area where the driver is patrolling, owner_id tells the id of the owner of the taxi, jobs shows how many jobs those driver have taken within a certain period.

2.3 Add Form

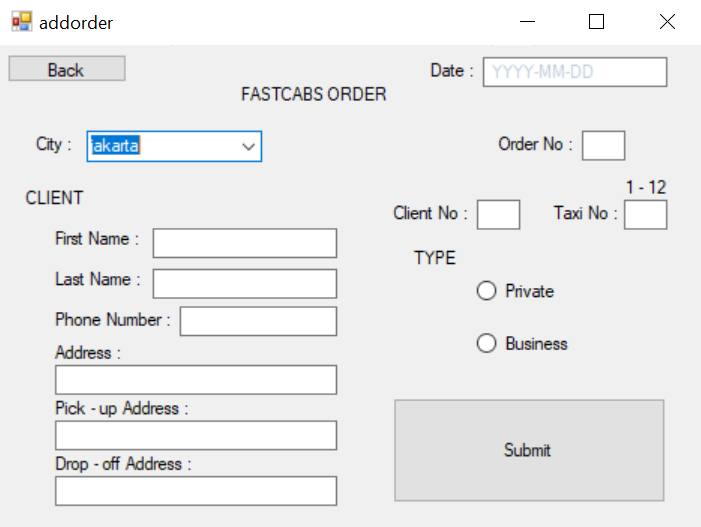
Add Order Form will be displayed by clicked ‘Add Order’ button in the main menu. When an order is made, the user save the informations of the clients and the orders through this form. There are city options, the name, phone number and address of the clients, the pick-up address, the drop-off address, date order, order no, client no, and also taxi no. Lastly the user choose whether the order type was private or business depends on the client. The user is required to click the submit button in order to store all the addOrder informations to the database.

2.4 Update Form

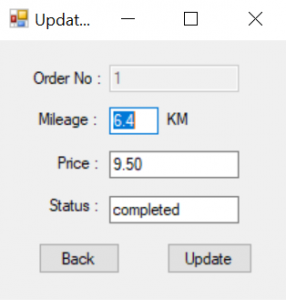
This Update Form allows user to update the selected order on main menu’s table, Update form will prompt user for mileage, price and status whether the order is incomplete or complete. The status, however will depends on driver’s report on radio.


Hello world!

Welcome to Binusian blog.
This is the first post of any blog.binusian.org member blog. Edit or delete it, then start blogging!
Happy Blogging 🙂